Hey there, tech enthusiasts and cloud adventurers! If you've ever wondered how to set up a remoteIoT VPC network using a Raspberry Pi on the free tier of AWS, you're in the right place. This isn't just another tutorial; it's your ultimate guide to creating a scalable, secure, and cost-effective IoT setup. Let’s dive into the world of remote IoT and discover how you can harness the power of AWS without breaking the bank.
Imagine this: you're building a smart home system or monitoring environmental data from remote sensors, and you want to connect all these devices seamlessly. A remoteIoT VPC network is your solution. By leveraging the capabilities of AWS and the versatility of Raspberry Pi, you can create a robust infrastructure that scales with your needs. Stick around, and we'll break it down step by step.
Before we jump into the nitty-gritty, let's address why this setup is so appealing. Not only does it give you full control over your IoT devices, but it also allows you to experiment with AWS services for free. Yes, FREE! Who doesn't love that? Now, let’s get started and explore how you can make this dream a reality.
- Unlocking The Power Of Supercell Pin A Comprehensive Guide
- Bollyflixspa The Ultimate Guide To Your Favorite Bollywood Movie Destination
Understanding RemoteIoT VPC Network Basics
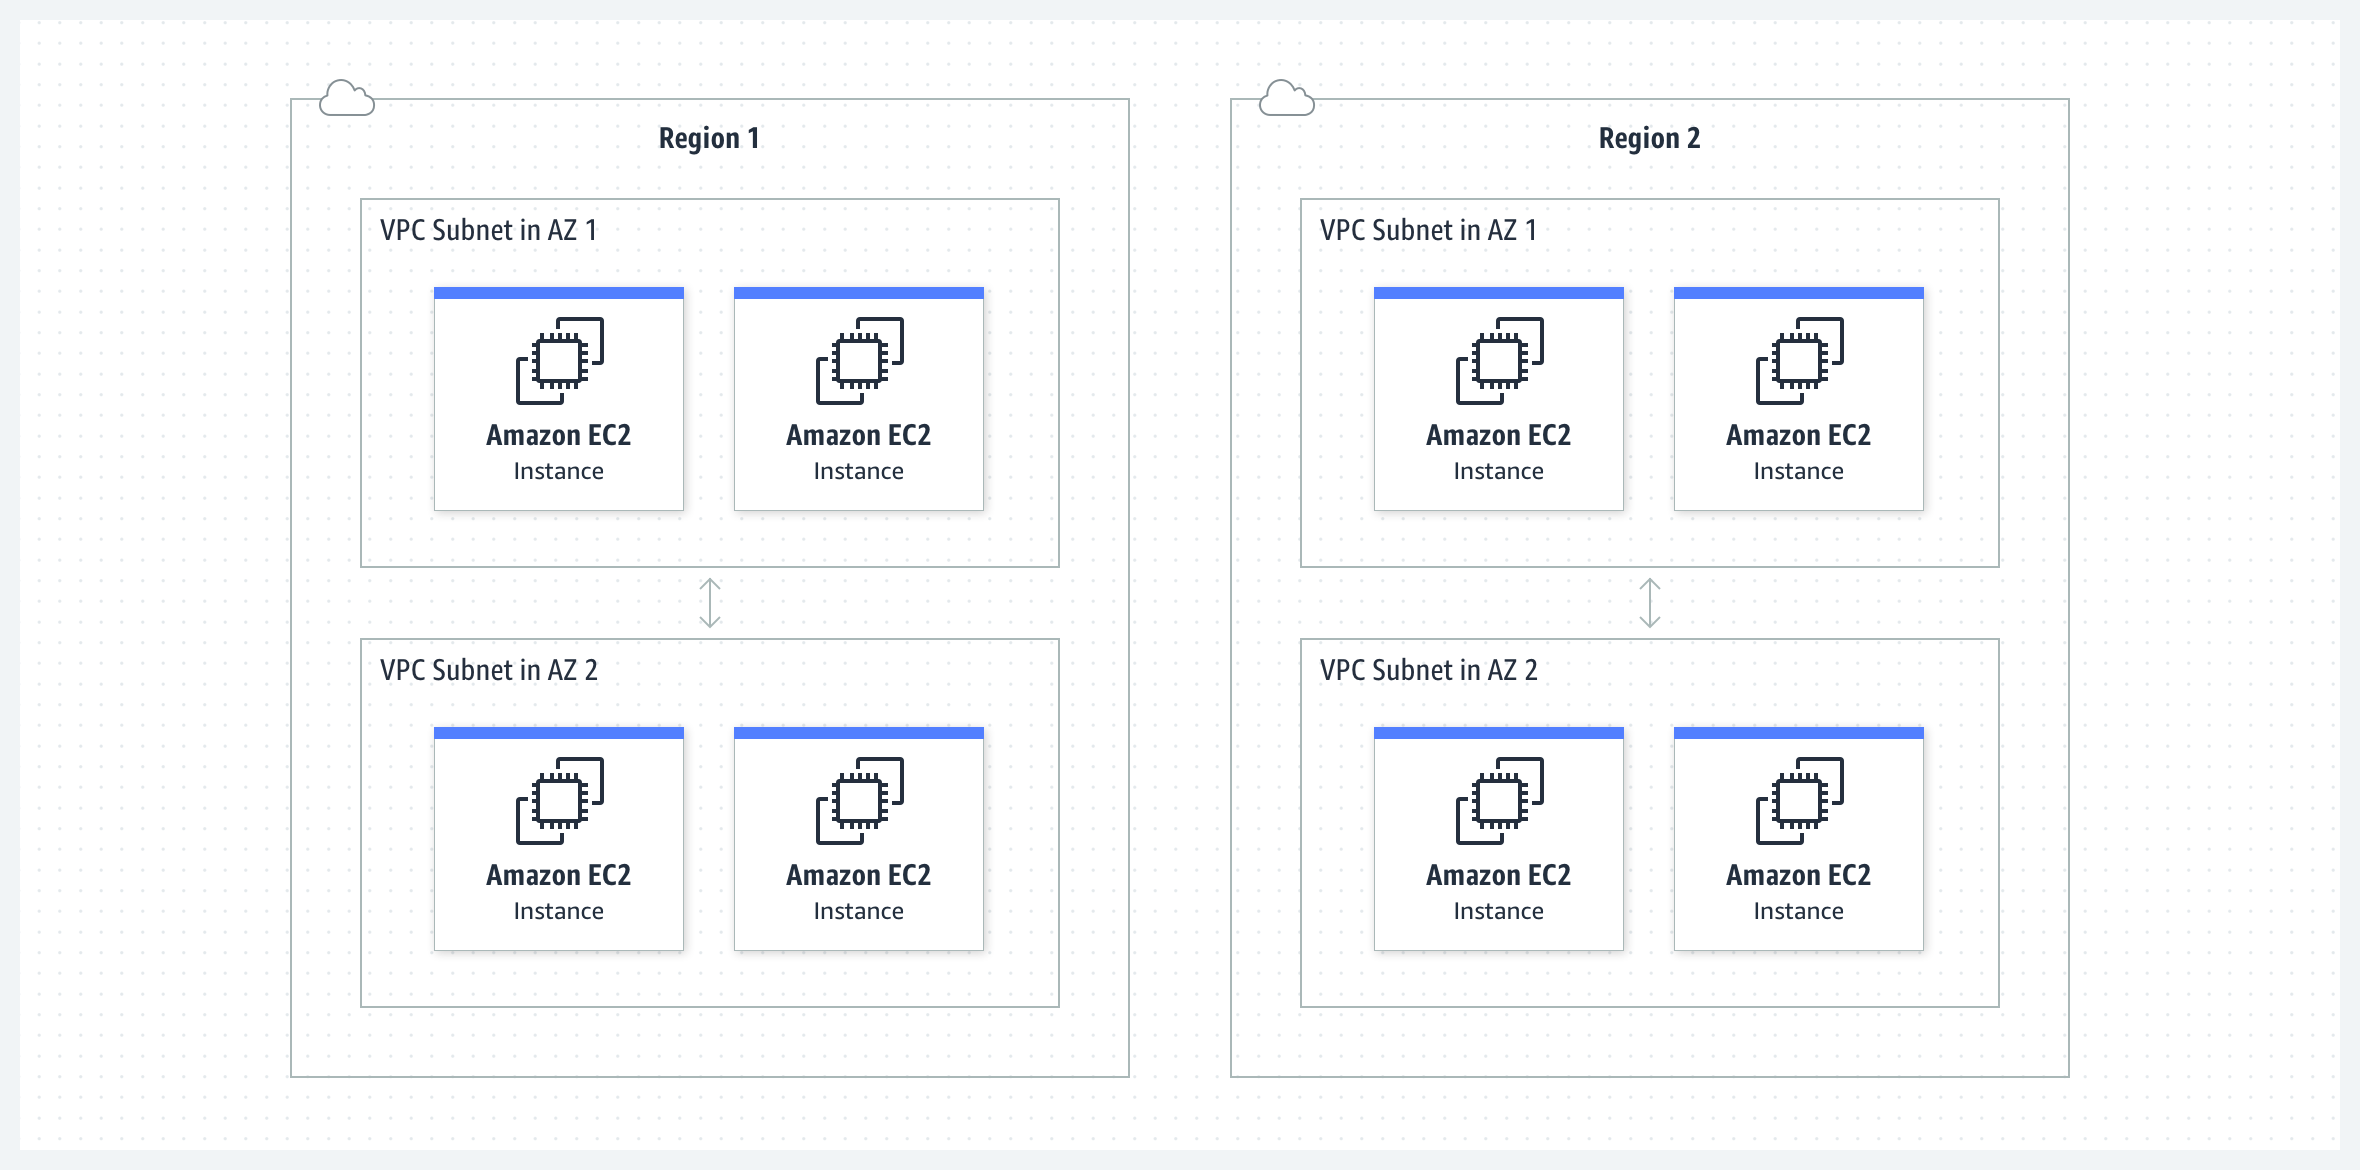
First things first, let’s talk about what a remoteIoT VPC network really means. VPC stands for Virtual Private Cloud, and it’s essentially your own isolated section of the AWS Cloud where you can launch AWS resources. By setting up a VPC specifically for IoT, you ensure that your devices communicate securely and efficiently without exposing them to the public internet.
This setup is perfect for hobbyists, startups, and even enterprises looking to test IoT solutions without committing to hefty costs. Plus, with Raspberry Pi acting as your gateway or edge device, you have a low-cost, highly versatile platform to experiment with.
Why Choose AWS Free Tier?
The AWS Free Tier offers a range of services that are perfect for beginners and small projects. You get access to essential services like EC2 instances, S3 storage, and Lambda functions—all for free for the first 12 months. For our remoteIoT VPC network, this means you can set up a basic infrastructure without worrying about monthly bills.
- Avas Private World A Journey Into The Heart Of Exclusivity And Privacy
- Mastering Ssh Remote Control For Raspberry Pi Your Ultimate Guide
- Free EC2 instances for hosting your Raspberry Pi scripts
- Secure data storage with S3
- Automated tasks with Lambda
Setting Up Your Raspberry Pi
Now that we’ve covered the basics, let’s focus on the heart of our setup: the Raspberry Pi. This tiny yet powerful device will serve as the brain of your remoteIoT VPC network. Here’s how you can prepare it:
What You’ll Need
- Raspberry Pi (preferably Pi 4 for better performance)
- MicroSD card with Raspbian OS installed
- Power supply
- Network connection (Wi-Fi or Ethernet)
Once you have everything ready, follow these steps to configure your Raspberry Pi:
- Install the latest version of Raspberry Pi OS
- Update the system with
sudo apt update && sudo apt upgrade - Set up SSH for remote access
- Install necessary packages like Python and AWS CLI
Creating a VPC on AWS
With your Raspberry Pi ready to go, it’s time to create a VPC on AWS. This is where your remoteIoT VPC network will live. Follow these steps to set up your VPC:
- Log in to your AWS Management Console
- Go to the VPC Dashboard and click on "Create VPC"
- Configure your VPC settings, including CIDR blocks and subnets
- Launch an EC2 instance within your VPC
Pro tip: Make sure to enable DNS hostnames and DNS resolution for easier communication between devices in your VPC.
Connecting Raspberry Pi to AWS VPC
Once your VPC is up and running, the next step is to connect your Raspberry Pi to it. This involves setting up a site-to-site VPN or using AWS IoT Core for device communication. Here’s how you can do it:
- Install the AWS IoT Device SDK on your Raspberry Pi
- Configure credentials and certificates for secure communication
- Test the connection by sending a simple message from your Pi to AWS IoT Core
Securing Your RemoteIoT VPC Network
Security should always be a top priority when setting up a remoteIoT VPC network. Here are some best practices to keep your setup safe:
- Use strong passwords and enable multi-factor authentication (MFA)
- Limit access to your VPC using security groups and network ACLs
- Regularly update your Raspberry Pi and AWS services
By following these guidelines, you can protect your IoT devices from potential threats and ensure smooth operation.
Monitoring and Managing Your Network
Now that your network is secure, it’s time to monitor and manage it effectively. AWS provides several tools to help you with this:
- CloudWatch for monitoring metrics and logs
- CloudTrail for auditing API calls
- AWS IoT Device Management for managing connected devices
Optimizing Costs with Free AWS Tier
One of the most appealing aspects of this setup is the ability to use AWS services for free. Here’s how you can make the most out of the Free Tier:
- Stick to services included in the Free Tier, like EC2 and S3
- Automate tasks with Lambda to reduce EC2 usage
- Monitor your usage closely to avoid unexpected charges
By optimizing your resource usage, you can keep your costs low while still enjoying the benefits of AWS.
Real-World Applications of RemoteIoT VPC Network
So, what can you actually do with a remoteIoT VPC network? The possibilities are endless! Here are a few examples:
- Smart home automation
- Environmental monitoring
- Industrial IoT applications
Each of these applications can be tailored to fit your specific needs, whether you’re building a personal project or scaling a business solution.
Success Stories and Case Studies
Let’s take a look at some real-world success stories:
- A startup used a remoteIoT VPC network to monitor air quality in urban areas
- A farmer implemented a smart irrigation system using Raspberry Pi and AWS
- A small business created a custom inventory management solution
These examples show just how versatile and powerful this setup can be.
Troubleshooting Common Issues
Even with the best planning, issues can arise. Here are some common problems and their solutions:
- Connection issues: Check your network settings and ensure all devices are properly configured
- Security concerns: Review your security policies and update them as needed
- Cost overruns: Monitor your usage and adjust your resources accordingly
By staying proactive, you can prevent these issues from derailing your project.
Seeking Help and Support
If you run into problems, don’t hesitate to seek help. AWS offers extensive documentation and a supportive community. Additionally, forums like Stack Overflow and Reddit can be great resources for troubleshooting.
Conclusion and Next Steps
And there you have it—a comprehensive guide to setting up a remoteIoT VPC network using Raspberry Pi on the free tier of AWS. By following the steps outlined in this article, you can create a secure, scalable, and cost-effective IoT infrastructure.
Now it’s your turn to take action. Start by setting up your Raspberry Pi and creating a VPC on AWS. Experiment with different services and applications to see what works best for you. And don’t forget to share your experience in the comments below!
Thanks for reading, and happy tinkering!
Table of Contents
- Understanding RemoteIoT VPC Network Basics
- Why Choose AWS Free Tier?
- Setting Up Your Raspberry Pi
- Creating a VPC on AWS
- Connecting Raspberry Pi to AWS VPC
- Securing Your RemoteIoT VPC Network
- Monitoring and Managing Your Network
- Optimizing Costs with Free AWS Tier
- Real-World Applications of RemoteIoT VPC Network
- Troubleshooting Common Issues

Detail Author:
- Name : Mr. Laverne Dare
- Username : arnold.shanahan
- Email : herman.angelica@robel.net
- Birthdate : 1971-11-21
- Address : 6361 McDermott Ferry North Ellie, NE 47677
- Phone : 563.414.2060
- Company : Fahey-Kihn
- Job : Structural Metal Fabricator
- Bio : Dolore natus inventore et necessitatibus. Quidem qui fugiat quod autem eos. Ut ipsa maiores hic sed distinctio commodi eius.
Socials
facebook:
- url : https://facebook.com/angelo.kessler
- username : angelo.kessler
- bio : Est laborum dolores quam eligendi.
- followers : 1269
- following : 2782
tiktok:
- url : https://tiktok.com/@angelo_id
- username : angelo_id
- bio : Explicabo recusandae laboriosam voluptatem nihil laboriosam quisquam.
- followers : 1494
- following : 1373
twitter:
- url : https://twitter.com/angelo_kessler
- username : angelo_kessler
- bio : Ex ut rerum eius quod beatae iure voluptatem magnam. Qui ea esse id doloribus dolorem. Eligendi voluptatem voluptatum illo aut.
- followers : 788
- following : 2190
